
OyezForms Installation Instructions
Click here to download the OyezForms installer.
Standalone (with option to centralise library for multiple users):
- Click 'Download' for standalone installer
- Run oyezforms.msi on first client machine
- Click Next
- Accept EULA and click Next
- Click Next
- Accept the 'Select Installation Folder' as C:\Program Files (x86)\Oyez\Oyez Legal Forms
- Click Install
- The program will start copying files
- Click Finish to complete setup
To share the library:
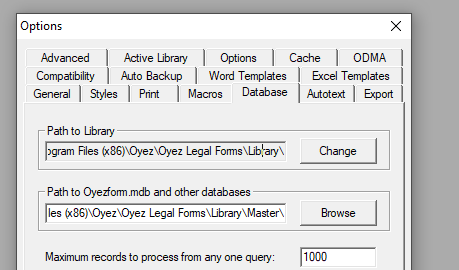
The library folder contains all library resources. Where more than one user of OyezForms exists, it can be desirable to centralise the form library. This allows a single user to update the library for all via Active Library. You can set the library path within OyezForms at any time via the OPTIONS > DATABASES tab.
Please ensure end users have sufficient access rights (Full Control) to the shared folder.
To share user files or completed forms:
You can also centralise user files (Clause library, shortlist, spellchecker files, and personal library) and stored completed forms. You can set these paths within Oyez at any time via the OPTIONS > GENERAL tab.
Please ensure end users have sufficient access rights (Full Control) to the shared folder.
Default path to user files: C:\Users\%username%\Documents\My Oyez Documents\ Default path to stored completed forms C:\Users\%username%\Documents\My Oyez Documents\
You should also amend the Library and Master locations. These can be found at Admin > Options > Databases. You should amend these to reflect where your network share resides.
Network Core (with Attached Users):
This installation type is considered legacy and should only be used if you have inherited this type of setup. Please contact support for assistance with moving to Standalone (with option to centralise library for multiple users).
Installing a networked version of Oyez is a 2-step process. Please ensure end users have sufficient access rights (Full Control) to the OyezForms folder.
Core (Server):
Installs Oyez to a shared network drive.
- Click 'Download' for network installer
- Run network.msi
- Click Next
- Accept EULA and click Next
- Change the ‘Destination Folder' as required (i.e. P:\Oyez32\) and click Next
- Click Install
- The program will start copying files
- Click Finish and proceed to Network Core (Attached User/Client)
Attached User (Client):
Installs minimum files on client machine to run OyezForms from shared network drive.
- From the client machine, navigate to the Server location (ie, P:\Oyez32\) open the Setup folder and double-click setup.exe
- Click Next
- Accept the EULA and click Next
- Click Install
- The program will start copying files
- Click Finish
Obtaining a Licence
Once you have completed the OyezForms installation, you will need to obtain a license to remove the word 'Specimen' from being printed on the forms. To obtain a license please contact support on 03300 602 102 option 1.
Configure Active Library to obtain your forms
Once you have access to the OyezForms software you will need to obtain your forms.
- On the toolbar click on Admin > Options > Active Library tab (this may be different in older versions)
- Tick Designated User, then enter your Oyez Account ID and Website Password. If you do not know these, please contact support
- Change 'Check for form updates' to your desired selections and click OK. We recommend - every seven days at least
- Click Admin > Synchronise Now
Defining Practice Details
- On the toolbar click on Admin > Practice Details
- You will be presented with a selection of boxes in which you should enter your practice details
- Once the details have been entered select the option Update